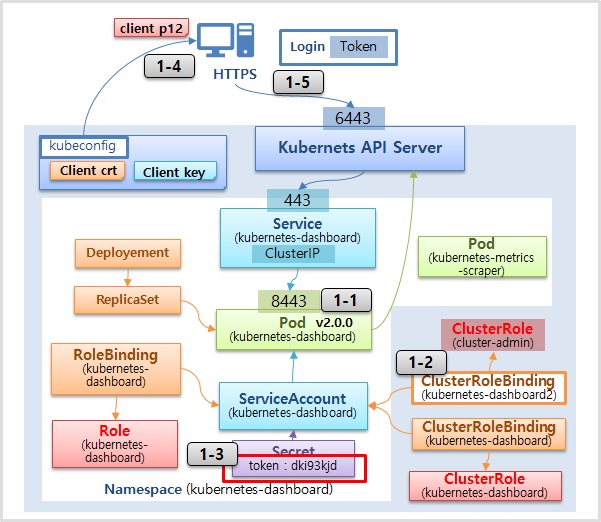
Dashboard
Kubeconfig, Token

1. Dashboard 설치

1-1) Dashboard 설치
# kubetm 가이드로 Dashboard대로 설치했을 경우 아래 명령으로 삭제
kubectl delete -f https://raw.githubusercontent.com/k8s-1pro/install/main/ground/k8s-1.27/dashboard-2.7.0/dashboard.yaml

# 다시 Dashboard (2.7.0) 설치 - <https://github.com/kubernetes/dashboard/releases/tag/v2.7.0>
kubectl apply -f https://raw.githubusercontent.com/kubernetes/dashboard/v2.7.0/aio/deploy/recommended.yaml
# kubetm 가이드로 Dashboard대로 설치했을 경우 아래 명령으로 삭제
kubectl delete -f https://kubetm.github.io/documents/appendix/kubetm-dashboard-v1.10.1.yaml
# 새 Dashboard (2.0.0) 설치 - <https://github.com/kubernetes/dashboard/releases/tag/v2.0.0>
kubectl apply -f https://raw.githubusercontent.com/kubernetes/dashboard/v2.0.0/aio/deploy/recommended.yaml1-2) ClusterRoleBinding 생성
cat <<EOF | kubectl create -f -
apiVersion: rbac.authorization.k8s.io/v1
kind: ClusterRoleBinding
metadata:
  name: kubernetes-dashboard2
roleRef:
  apiGroup: rbac.authorization.k8s.io
  kind: ClusterRole
  name: cluster-admin
subjects:
- kind: ServiceAccount
  name: kubernetes-dashboard
  namespace: kubernetes-dashboard
EOF
cat <<EOF | kubectl create -f -
apiVersion: rbac.authorization.k8s.io/v1beta1
kind: ClusterRoleBinding
metadata:
name: kubernetes-dashboard2
labels:
k8s-app: kubernetes-dashboard
roleRef:
apiGroup: rbac.authorization.k8s.io
kind: ClusterRole
name: cluster-admin
subjects:
- kind: ServiceAccount
name: kubernetes-dashboard
namespace: kubernetes-dashboard
EOF1-3) Token 확인
// Secret 생성
cat <<EOF | kubectl create -f -
apiVersion: v1
kind: Secret
metadata:
  name: kubernetes-dashboard-token
  namespace: kubernetes-dashboard
  annotations:
    kubernetes.io/service-account.name: "kubernetes-dashboard"
type: kubernetes.io/service-account-token
EOF

// Token 확인
kubectl -n kubernetes-dashboard get secret kubernetes-dashboard-token -o jsonpath='{.data.token}' | base64 --decode
kubectl -n kubernetes-dashboard get secret kubernetes-dashboard-token- \-o jsonpath='{.data.token}' | base64 --decode1-4) 내 PC에 인증서 설치
grep 'client-certificate-data' ~/.kube/config | head -n 1 | awk '{print $2}' | base64 -d >> client.crt
grep 'client-key-data' ~/.kube/config | head -n 1 | awk '{print $2}' | base64 -d >> client.key
openssl pkcs12 -export -clcerts -inkey client.key -in client.crt -out client.p12 -name "k8s-master-30"
kubecfg.p12 파일을 내 PC에서 인증서 등록
- Mac에서는 p12 파일을 cer파일로 한번 더 변환해 준 후 client.cer 파일을 PC에 등록해 주면 됩니다.
openssl pkcs12 -in client.p12 -clcerts -nokeys -out client.cer
- 또한 아래와 같은 에러가 나올 시에는 “services "https:kubernetes-dashboard:" is forbidden: User "system:anonymous" cannot get resource "services/proxy" in API group "" in the namespace "kubernetes-dashboard"
아래 두 리소스를 추가해보세요.
cat <<EOF | kubectl apply -f -
kind: ClusterRole
apiVersion: rbac.authorization.k8s.io/v1
metadata:
  name: kubernetes-dashboard-anonymous
rules:
- apiGroups: [""]
  resources: ["services/proxy"]
  resourceNames: ["https:kubernetes-dashboard:"]
  verbs: ["get", "list", "watch", "create", "update", "patch", "delete"]
- nonResourceURLs: ["/ui", "/ui/*", "/api/v1/namespaces/kube-system/services/https:kubernetes-dashboard:/proxy/*"]
  verbs: ["get", "list", "watch", "create", "update", "patch", "delete"]
EOF
cat <<EOF | kubectl apply -f -
apiVersion: rbac.authorization.k8s.io/v1
kind: ClusterRoleBinding
metadata:
  name: kubernetes-dashboard-anonymous
roleRef:
  apiGroup: rbac.authorization.k8s.io
  kind: ClusterRole
  name: kubernetes-dashboard-anonymous
subjects:
- kind: User
  name: system:anonymous
EOF
1-5) Https 로 Dashboard 접근 후 Token 으로 로그인
https://192.168.56.30:6443/api/v1/namespaces/kubernetes-dashboard/services/https:kubernetes-dashboard:/proxy/#/loginhttps://192.168.0.30:6443/api/v1/namespaces/kubernetes-dashboard/services/https:kubernetes-dashboard:/proxy/#/login