Storage Architecture
FileStorage(NFS), BlockStorage(Longhorn)

1. FTP Server 구축
1-1) NFS 패키지 다운 및 설치
설치
yum -y install nfs-utils rpcbind
systemctl start rpcbind
systemctl start nfs-server
systemctl start rpc-statd
systemctl enable rpcbind
systemctl enable nfs-server
확인
systemctl status nfs-server
1-2) 공유 폴더 생성 및 설정
공유 폴더 생성
mkdir /share-data
chmod 777 /share-data
vi /etc/exports 로 아래 내용 입력 후 저장
/share-data *(rw,sync,no_root_squash)
반영
exportfs -r
방화벽 해제 및 NFS Server재시작
systemctl stop firewalld && systemctl disable firewalld
systemctl stop NetworkManager && systemctl disable NetworkManager
systemctl restart nfs-server
node1 및 node2에 NFS 클라이언트 설치
sudo yum install nfs-utils
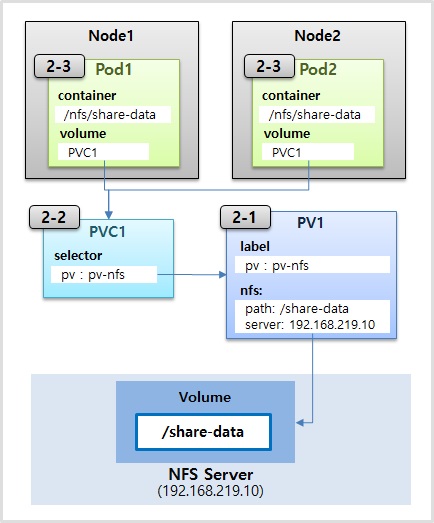
2. FileStroage (NFS) 연결 Pod

2-1) NFS 연결을 위한 PersistentVolume 생성
apiVersion: v1
kind: PersistentVolume
metadata:
  name: pv-nfs
  labels:
    pv: pv-nfs
spec:
  capacity:
    storage: 2G
  accessModes:
  - ReadWriteMany
  nfs:
    path: /share-data
    server: 192.168.219.10
2-2) PersistentVolumeClaim
apiVersion: v1
kind: PersistentVolumeClaim
metadata:
  name: pvc-nfs
spec:
  accessModes:
  - ReadWriteMany
  resources:
    requests:
      storage: 2G
  storageClassName: ""
  selector:
    matchLabels:
      pv: pv-nfs
2-3) Pod
apiVersion: v1
kind: Pod
metadata:
  name: pod-nfs
spec:
  containers:
  - name: container
    image: kubetm/init
    volumeMounts:
    - name: volume-nfs
      mountPath: /nfs/share-data
  volumes:
  - name : volume-nfs
    persistentVolumeClaim:
      claimName: pvc-nfs
3. Longhorn 구축
해당 솔루션 설치는 [중급편] > 기본 오브젝트 > Volume (1.27)를 통해서 이미 하셨으면 Skip 하세요!
- 설치 링크 : https://kubetm.github.io/k8s/07-intermediate-basic-resource/volume2/#1-longhorn-%EA%B5%AC%EC%B6%95
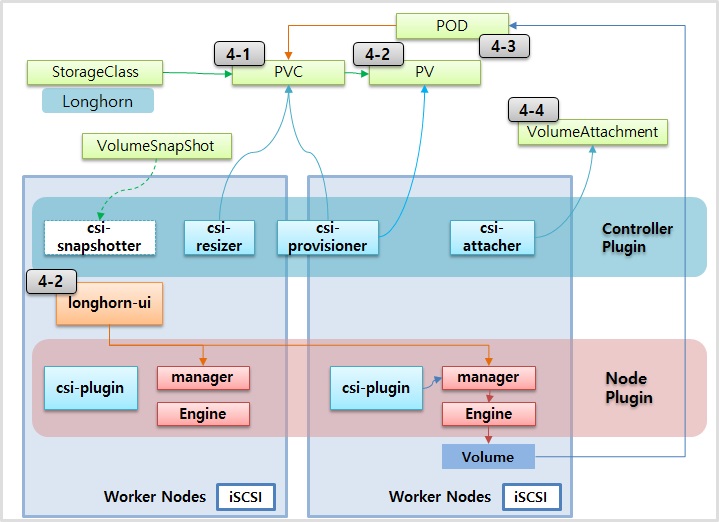
4. Longhorn Volume에 POD 연결

4-1) PersistentVolumeClaim
apiVersion: v1
kind: PersistentVolumeClaim
metadata:
  name: longhorn-pvc
spec:
  accessModes:
    - ReadWriteOnce
  storageClassName: longhorn
  resources:
    requests:
      storage: 1Gi
4-2) Longhorn Dashboard 접속
http://192.168.56.30:30705
4-3) Pod
apiVersion: v1
kind: Pod
metadata:
  name: pod-blockstorage
spec:
  containers:
  - name: container
    image: kubetm/init
    volumeMounts:
    - name: volume-blockstorage
      mountPath: /longhorn/data
  volumes:
  - name : volume-blockstorage
    persistentVolumeClaim:
      claimName: longhorn-pvc
4-4) Longhorn Volumeattachments 확인
kubectl get -n longhorn-system volumeattachments.storage.k8s.io
Referenece
Kubernetes
- PV Access Mode : https://kubernetes.io/docs/concepts/storage/persistent-volumes/#access-modes
- PV Provisioner : https://kubernetes.io/docs/concepts/storage/storage-classes/#provisioner
- CSI Developer Documentation : https://kubernetes-csi.github.io/docs/
Others
- Install Longhorn : https://longhorn.io/docs/0.8.1/deploy/install/install-with-kubectl/