Pod
Container, Label, NodeSchedule

1. Container

필독! Pod 생성시 확인 사항
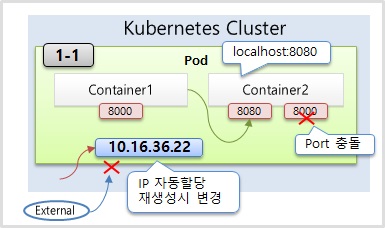
Kubernetes Dashboard 상단 콤보박스에서 꼭 Namespace를 [default]로 해서 작업해주세요. 만약 [모든 네임스페이스]로 되어 있다면 Pod 생성시 [Deploying file has failed] 에러가 발생합니다.1-1) Pod
apiVersion: v1
kind: Pod
metadata:
  name: pod-1
spec:
  containers:
  - name: container1
    image: kubetm/p8000
    ports:
    - containerPort: 8000
  - name: container2
    image: kubetm/p8080
    ports:
    - containerPort: 8080
1-2) ReplicationController
apiVersion: v1
kind: ReplicationController
metadata:
  name: replication-1
spec:
  replicas: 1
  selector:
    app: rc
  template:
    metadata:
      name: pod-1
      labels:
        app: rc
    spec:
      containers:
      - name: container
        image: kubetm/init
2. Label

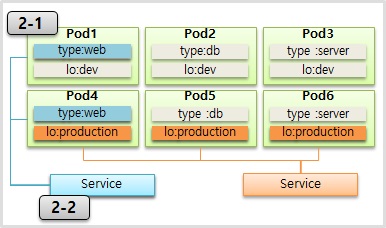
2-1) Pod
apiVersion: v1
kind: Pod
metadata:
  name: pod-2
  labels:
    type: web
    lo: dev
spec:
  containers:
  - name: container
    image: kubetm/init
2-2) Service
apiVersion: v1
kind: Service
metadata:
  name: svc-1
spec:
  selector:
    type: web
  ports:
  - port: 8080
3. Node Schedule

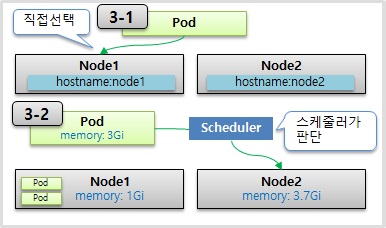
3-1) Pod
apiVersion: v1
kind: Pod
metadata:
  name: pod-3
spec:
  nodeSelector:
    kubernetes.io/hostname: k8s-node1
  containers:
  - name: container
    image: kubetm/init
3-2) Pod
apiVersion: v1
kind: Pod
metadata:
  name: pod-4
spec:
  containers:
  - name: container
    image: kubetm/init
    resources:
      requests:
        memory: 2Gi
      limits:
        memory: 3Gi
CPU와 Memory의 (request, limits)에 대한 강의 내용 보충
CPU가 limits까지 올라갔을 때 reqeusts 수치까지 core 사용량을 낮춘다고 한 부분을 정정합니다. 기본적으로 쿠버네티스가 CPU를 limits까지 제한시키나 노드에 여유 CPU가 있다면, limit을 넘어 사용할 때도 있습니다. 하지만 Node가 부하상태(OverCommit)가 되면, 각 Pod들의 limits 수치를 기준으로 Pod들간에 CPU를 상대적으로 하향 조정합니다. 그렇기 때문에 requests 수치까지 core 사용량을 낮춘다는 표현은 잘못됐고, request는 어떤 어떤 상황에서도 최소한으로 보장되는 수치입니다.
Memory는 limits까지 올라가면 OOM(Out of Memory) 에러를 발생시키며, Contianer를 강제로 종료시키니다. 그래서 Pod의 restart 수는 1로 증가하며, Container를 재기동 시킵니다.
Sample Yaml
Pod
apiVersion: v1
kind: Pod
metadata:
  name: pod-4                           # Pod 이름
  labels:                               # Label
    type: web
    lo: dev
spec:
  nodeSelector:                         # Node 직접 지정시
    kubernetes.io/hostname: k8s-node1
  containers:
  - name: container                     # Container 이름
    image: kubetm/init                  # 이미지 선택
    ports:
    - containerPort: 8080
    resources:                          # 자원 사용량 설정
      requests:
        memory: 1Gi
      limits:
        memory: 1Gi
kubectl
Create
# 파일이 있을 경우
kubectl create -f ./pod.yaml

# 내용과 함께 바로 작성
kubectl create -f - <<END
apiVersion: v1
kind: Pod
metadata:
  name: pod1
spec:
  containers:
  - name: container
    image: kubetm/init
END
Apply
kubectl apply -f ./pod.yaml
Get
# 기본 Pod 리스트 조회 (Namepsace 포함)
kubectl get pods -n defalut

# 좀더 많은 내용 출력
kubectl get pods -o wide

# Pod 이름 지정
kubectl get pod pod1

# Json 형태로 출력
kubectl get pod pod1 -o json
Describe
# 상세 출력
kubectl describe pod pod1
Delete
# 파일이 있을 경우 생성한 방법 그대로 삭제
kubectl delete -f ./pod.yaml

# 내용과 함께 바로 작성한 경우 생성한 방법 그대로 삭제
kubectl delete -f - <<END
apiVersion: v1
kind: Pod
metadata:
  name: pod1
spec:
  containers:
  - name: container
    image: kubetm/init
END

# Pod 이름 지정
kubectl delete pod pod1
Exec
# Pod이름이 pod1인 Container로 들어가기 (나올땐 exit)
kubectl exec pod1 -it /bin/bash

# Container가 두개 이상 있을때 Container이름이 con1인 Container로 들어가기
kubectl exec pod1 -c con1 -it /bin/bash
Tips
Apply vs Create
- 둘다 자원을 생성할때 사용할 수 있지만, [Create]는 기존에 같은 이름의 Pod가 존재하면 생성이 안되고, [Apply]는 기존에 같은 이름의 Pod가 존재하면 업데이트됨
Referenece
Kubernetes
- Pod Overview : https://kubernetes.io/docs/concepts/workloads/pods/pod-overview/
- Labels and Selectors : https://kubernetes.io/docs/concepts/overview/working-with-objects/labels/
- Assigning Pods to Nodes : https://kubernetes.io/docs/concepts/configuration/assign-pod-node/